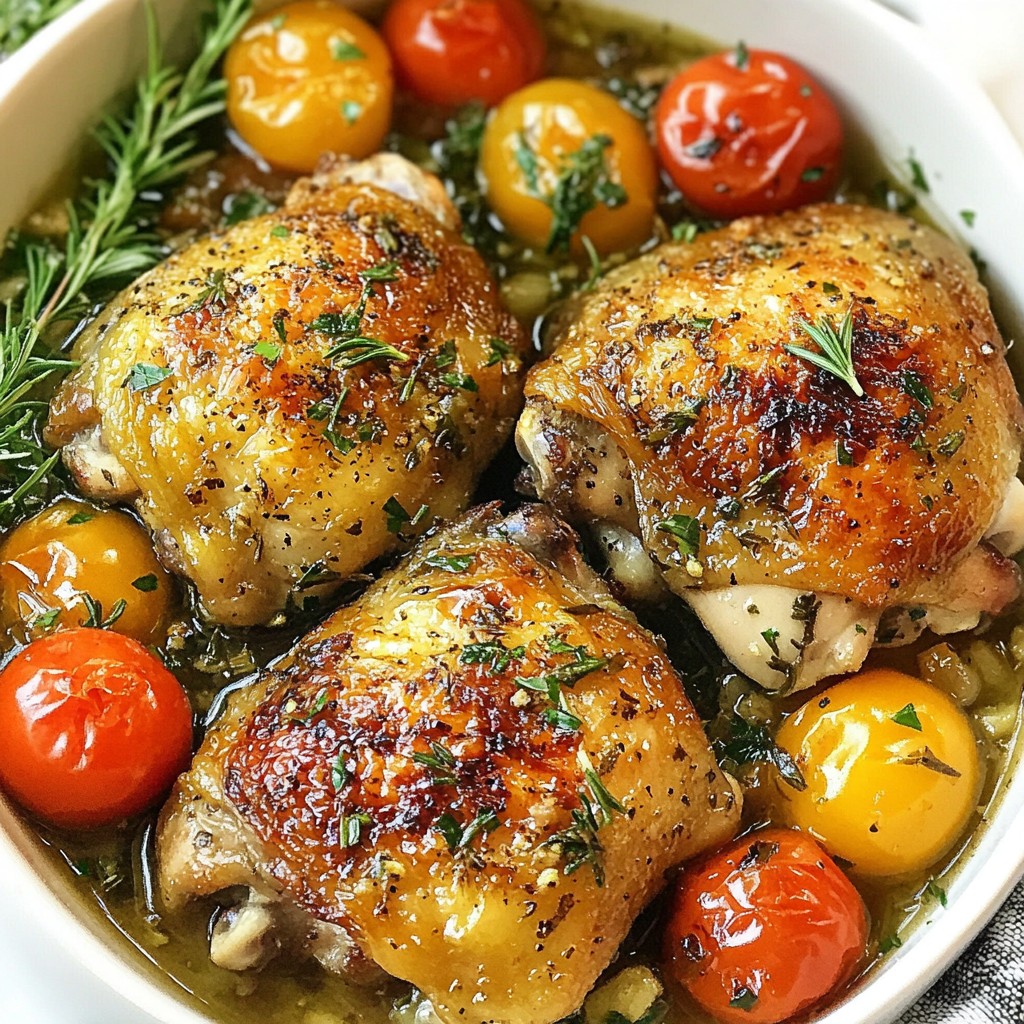
Looking for a simple and tasty weeknight dinner? Garlic Herb Chicken Thighs are your answer! This dish brings together juicy chicken and fresh herbs in an easy recipe that packs a punch of flavor. Whether you're a kitchen newbie or a seasoned pro, you'll find valuable tips and tricks to make your meal shine. Let's dive into the ingredients and get cooking!
Why I Love This Recipe
- Flavorful Herbs: The combination of fresh rosemary and thyme creates a fragrant and savory profile that elevates the chicken's taste.
- Crispy Skin: Searing the chicken thighs ensures a delightful crispy skin that contrasts beautifully with the juicy meat underneath.
- Easy One-Pan Meal: Cooking everything in one skillet means less cleanup, and the broth keeps the dish moist and flavorful.
- Vibrant Presentation: The cherry tomatoes add a pop of color and sweetness, making the dish visually appealing when served.
Ingredients
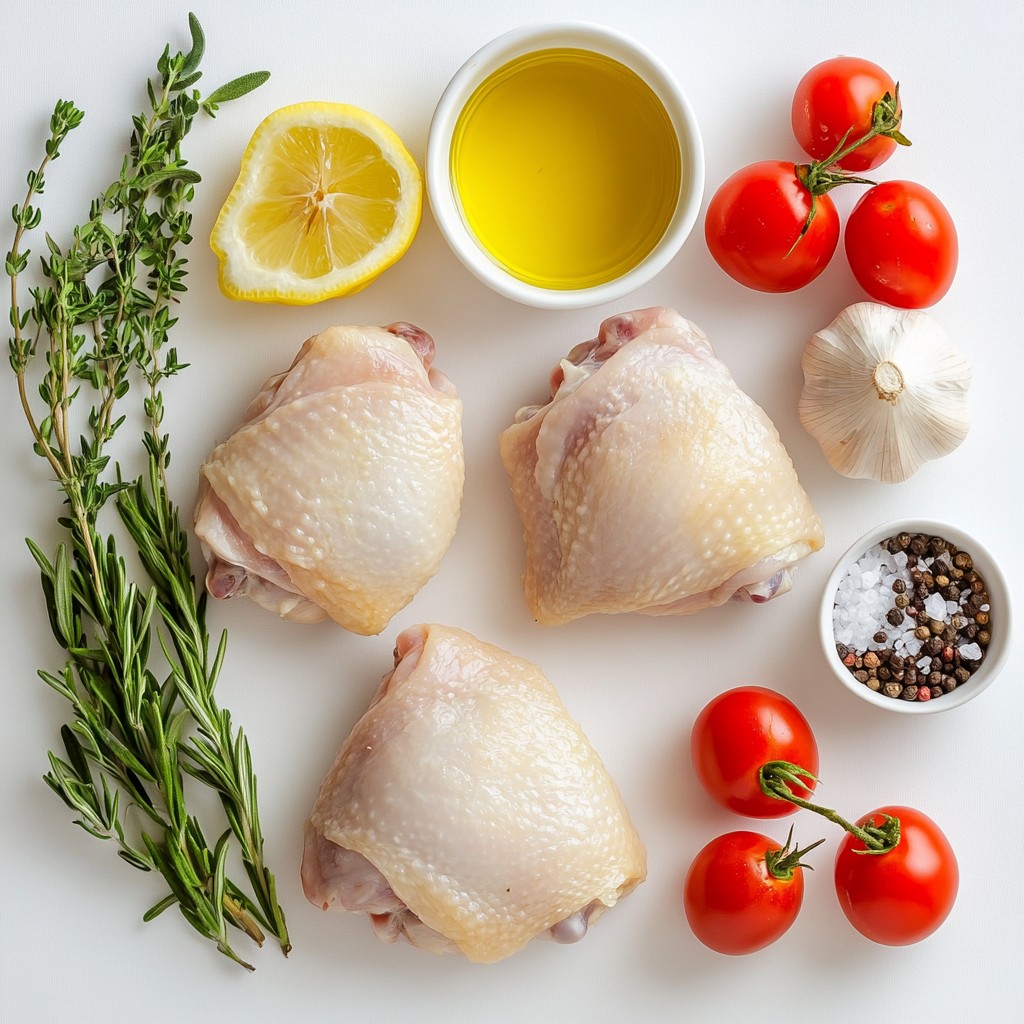
Complete List of Ingredients
To make Garlic Herb Chicken Thighs, gather these fresh ingredients:
- 4 bone-in, skin-on chicken thighs
- 4 cloves garlic, minced
- 2 tablespoons fresh rosemary, chopped
- 2 tablespoons fresh thyme, chopped
- 1 tablespoon olive oil
- 1 teaspoon lemon zest
- Salt and pepper to taste
- 1 cup chicken broth
- 1 cup cherry tomatoes, halved
- Fresh parsley for garnish
Ingredient Substitutes
If some ingredients aren’t available, here are good substitutes:
- Use skinless chicken thighs if you prefer less fat.
- Swap rosemary and thyme for dried herbs if fresh isn’t an option. Use one-third of the amount.
- Replace olive oil with avocado oil for a different flavor.
- For chicken broth, vegetable broth works well too.
- You can use regular tomatoes if cherry tomatoes are not on hand.
Tips for Selecting Quality Ingredients
Quality ingredients make a big difference in taste. Here’s what to look for:
- Chicken: Choose thighs that feel firm and have no off smell. The skin should be smooth and not slimy.
- Garlic: Look for garlic that is firm and dry. Avoid any that has sprouted or feels soft.
- Herbs: Fresh herbs should smell strong. Look for vibrant color with no wilting.
- Tomatoes: Pick tomatoes that feel heavy for their size. They should be bright and firm.
- Olive Oil: Go for extra virgin olive oil. Check for a harvest date on the label to ensure freshness.
Using fresh, high-quality ingredients will lead to a more flavorful dish that impresses everyone at the table.
Step-by-Step Instructions
Preparation Instructions
First, gather your ingredients. You need four bone-in, skin-on chicken thighs, four cloves of minced garlic, and fresh rosemary and thyme. Measure two tablespoons of each herb. You will also need one tablespoon of olive oil, one teaspoon of lemon zest, salt, and pepper. Lastly, have one cup of chicken broth and one cup of halved cherry tomatoes ready.
Next, preheat your oven to 400°F (200°C). In a small bowl, mix the minced garlic, chopped rosemary, chopped thyme, olive oil, lemon zest, salt, and pepper. This mixture will pack your chicken with flavor.
Now, take the chicken thighs and pat them dry with paper towels. This helps the skin get crispy. Lift the skin gently and rub half of your herb mixture directly onto the meat. Then, spread the other half on top of the skin.
Cooking Instructions
Heat a large, oven-safe skillet over medium-high heat. Once hot, place the chicken thighs skin-side down in the skillet. Sear them for five to seven minutes until the skin turns golden and crispy. After that, flip the thighs and sear the other side for three to four minutes.
Remove the skillet from the heat. Add the chicken broth and halved cherry tomatoes around the chicken thighs. This will create a lovely sauce while cooking.
Now, transfer the skillet to the preheated oven. Roast for 25 to 30 minutes. You want the chicken's internal temperature to reach 165°F (75°C). This ensures the chicken is safe to eat.
Once cooked, take the skillet out of the oven. Let the chicken rest for five minutes. This helps keep it juicy. Garnish with fresh parsley before serving.
Tips for Monitoring Doneness
To check if the chicken is done, use a meat thermometer. Insert it into the thickest part of the thigh, avoiding the bone. If it reads 165°F (75°C), your chicken is ready. If you don’t have a thermometer, you can cut into the chicken. The juices should run clear, not pink.
Also, keep an eye on the skin. It should be crispy and browned. If it starts to darken too much, cover it with foil. This will stop it from burning while the chicken finishes cooking. Enjoy your flavorful garlic herb chicken thighs!
Tips & Tricks
How to Achieve Crispy Chicken Skin
To get that perfect crispy skin, start with bone-in, skin-on chicken thighs. The fat under the skin helps it to crisp up nicely. Here’s how to do it:
- Pat the skin dry: Use paper towels to remove extra moisture. This step is key for crispiness.
- Sear the chicken: Heat your skillet to medium-high heat. Place the chicken skin-side down for 5-7 minutes. This browning step gives a nice color and texture.
- Don’t crowd the pan: Make sure there’s space between the thighs. This helps hot air circulate.
The result? A golden, crunchy skin that you will crave!
Enhancing Flavor with Additional Herbs
You can boost flavor with more herbs. Try these ideas:
- Basil: Adds a sweet touch that brightens the dish.
- Oregano: Gives a warm, earthy flavor that pairs well with chicken.
- Sage: Offers a savory note that adds depth.
Mix these herbs into your garlic herb mixture for a fun twist. Just chop them finely and blend them in.
Common Mistakes to Avoid
Here are a few mistakes to steer clear of when making garlic herb chicken thighs:
- Skipping the searing step: This step locks in flavor and moisture. Don’t skip it!
- Not letting the chicken rest: After cooking, let the chicken rest for 5 minutes. This keeps it juicy.
- Ignoring the internal temperature: Always check that it reaches 165°F (75°C). This ensures it's safe to eat.
By avoiding these common pitfalls, your dish will turn out tasty and impressive!
Pro Tips
- Resting Time: Allow the chicken thighs to rest for 5 minutes after cooking. This helps the juices redistribute, making the meat more tender and flavorful.
- Skin Crispiness: For extra crispy skin, ensure the chicken is patted dry before seasoning and searing. Moisture can prevent the skin from becoming crisp.
- Herb Variations: Feel free to substitute or add other herbs like oregano or basil for a different flavor profile. Fresh herbs can enhance the dish significantly.
- Use of Broth: Using chicken broth instead of water adds depth to the flavor. Homemade broth is ideal, but store-bought works well too.
Variations
Different Cooking Methods
You can cook garlic herb chicken thighs in various ways. Grilling gives a smoky flavor. Just preheat your grill and place the seasoned thighs on it. Cook for 7-10 minutes per side until done.
Air frying is quick and easy. Set your air fryer to 380°F (193°C). Cook the thighs for 25 minutes, flipping halfway. This method makes the skin crispy without much oil.
Oven roasting is also great. It keeps the chicken juicy and tender. Follow the recipe's oven instructions for best results.
Flavor Customizations
You can change the flavor of your chicken thighs easily. For a citrus twist, add orange or lime zest to the herb mix. This brightens the dish.
If you like spice, add crushed red pepper or chili flakes. This gives a nice kick. You can also try different herbs. Basil or oregano work well for a fresh taste.
Mix in some honey for sweetness or mustard for tang. These options create new flavors and keep things fun.
Serving Suggestions
Pair your garlic herb chicken thighs with tasty sides. Roasted vegetables like carrots and broccoli are great. They add color and nutrients.
You can also serve it with a light salad. A simple mix of greens, cherry tomatoes, and a vinaigrette is refreshing.
Don’t forget about grains! Rice or quinoa absorbs the broth and adds heartiness. Get creative with your plate and enjoy!
Storage Info
Best Practices for Storing Leftovers
To keep your garlic herb chicken thighs fresh, store them in an airtight container. Let them cool first, then seal them tight. This helps to lock in flavor and moisture. You can also use plastic wrap if you don’t have a container. The chicken stays good in the fridge for up to three days.
Reheating Tips
When it’s time to reheat, the oven works best. Preheat it to 350°F (175°C). Place the chicken in an oven-safe dish and cover it with foil. This keeps the chicken moist. Heat for about 15-20 minutes or until warm. You can also use a microwave, but it may dry out the chicken. If you use the microwave, cover it with a damp paper towel.
Freezing Recommendations
If you want to save some for later, you can freeze the chicken. Wrap each piece in plastic wrap, then place them in a freezer bag. Make sure to remove as much air as possible. This can help prevent freezer burn. Garlic herb chicken thighs can last up to three months in the freezer. When you’re ready to eat, thaw them in the fridge overnight before reheating.
FAQs
How long to cook garlic herb chicken thighs?
Cook garlic herb chicken thighs for 25 to 30 minutes in the oven. Make sure the internal temperature reaches 165°F (75°C). This ensures they are safe to eat. The skin should be crispy and golden brown. The broth and tomatoes add moisture and flavor.
Can I use boneless chicken thighs?
Yes, you can use boneless chicken thighs. They cook faster than bone-in thighs. If you use boneless thighs, reduce the cooking time to about 20 to 25 minutes. The chicken will still be juicy and flavorful. Adjust the herb mixture as needed for taste.
What herbs can I substitute?
You can substitute many herbs in this recipe. For example, use sage or oregano if you don't have rosemary or thyme. Fresh herbs bring the best flavor, but dried herbs work too. Just remember, dried herbs are stronger, so use less. Experiment with your favorites to find the best mix!
In this post, we covered the key ingredients for garlic herb chicken thighs and discussed how to choose quality items. I provided step-by-step instructions for preparation and cooking, along with tips to ensure perfectly cooked chicken. We also explored various cooking methods and flavor options to customize your dish. Finally, I shared best practices for storing and reheating leftovers. Remember, good cooking starts with great ingredients, and these tips will help you succeed. Enjoy your delicious meal!
.png)