Are you ready to treat your taste buds? In this guide, I’ll show you how to make Peanut Butter Chocolate Rice Krispie Treats that will delight everyone. With just a few simple ingredients and easy steps, you can create a snack that’s chewy, crunchy, and oh-so-delicious. Whether you’re a baking pro or just starting out, you’ll find tips and tricks that make this recipe shine. Let’s dive in!
Why I Love This Recipe
- Quick and Easy: This recipe comes together in just a few simple steps, making it perfect for a last-minute treat or snack.
- Irresistible Flavor: The combination of creamy peanut butter and rich chocolate creates a deliciously satisfying taste that both kids and adults love.
- No-Bake Delight: With no baking required, these treats are a great way to beat the heat while still enjoying a sweet dessert.
- Customizable: You can easily modify the recipe by adding nuts, dried fruit, or using different types of chocolate to suit your preferences.
Ingredients
Essential Ingredients for Peanut Butter Chocolate Rice Krispie Treats
To make these treats, gather these key ingredients:
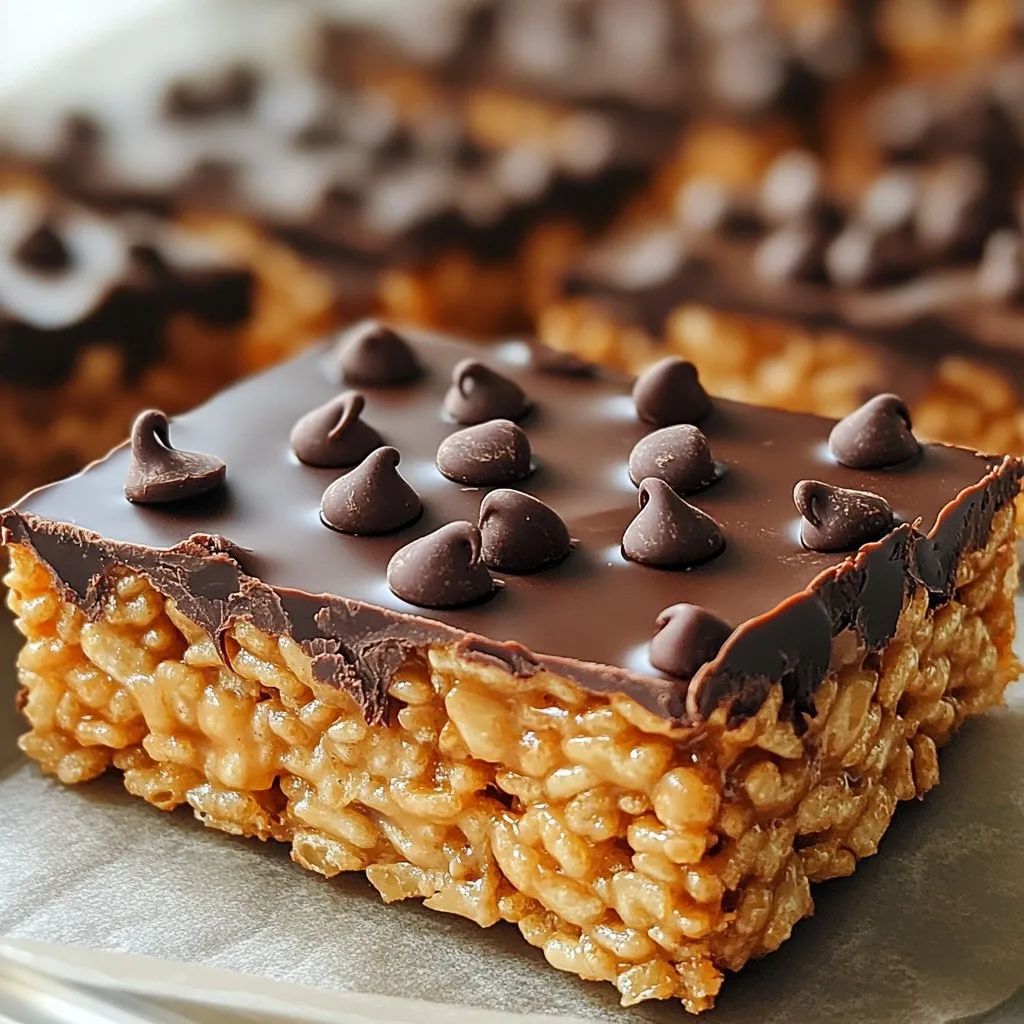
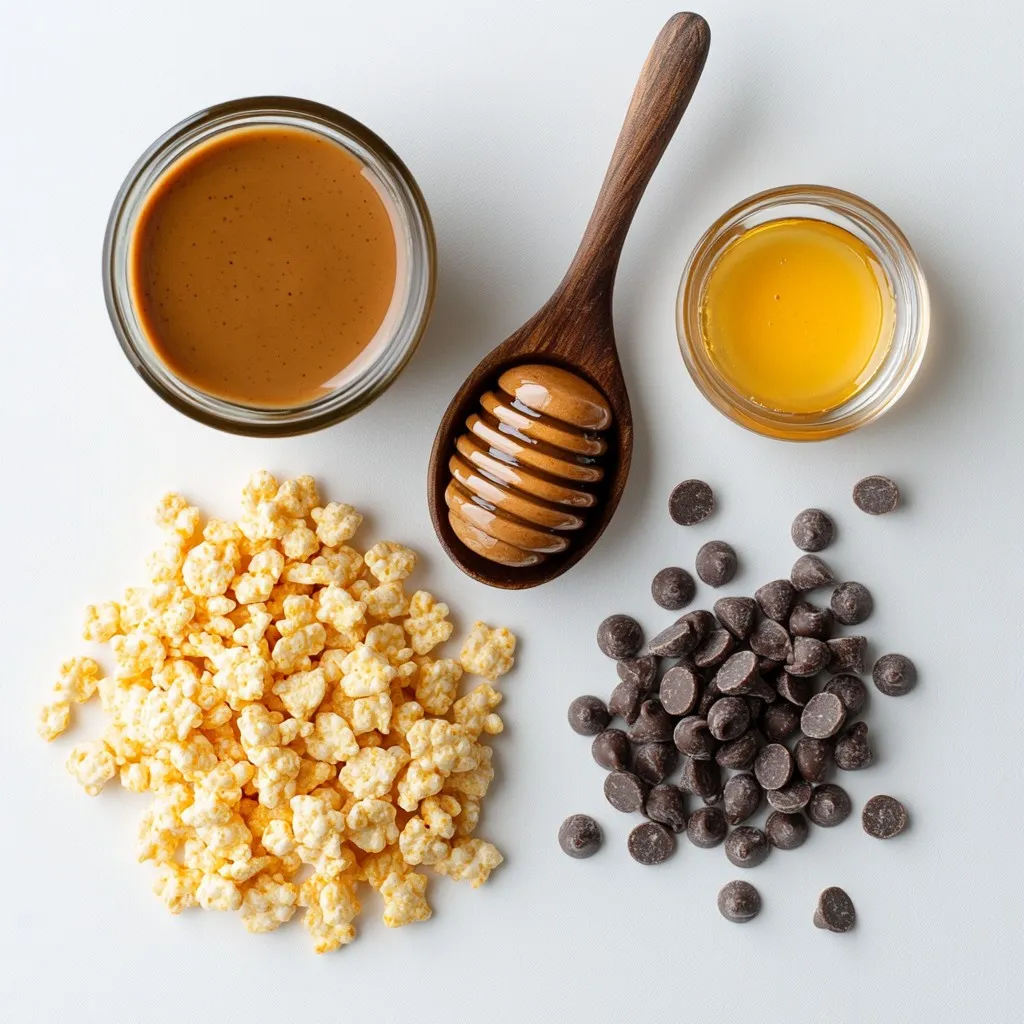
– 3 cups Rice Krispies cereal
– 1 cup creamy peanut butter
– 1 cup chocolate chips (semi-sweet or dark)
– ½ cup honey or maple syrup
– 1 teaspoon vanilla extract
– A pinch of salt
These ingredients create a tasty balance of sweet and salty. The creamy peanut butter adds richness. The chocolate chips bring a delicious sweetness that melts slightly into the mixture.
Optional Ingredients for Customization
You can customize your treats with these options:
– ½ cup additional chocolate chips for topping
– A sprinkle of sea salt for extra flavor
– Chopped nuts for crunch
– Mini marshmallows for a chewy twist
These extras let you tailor the treats to your taste. You might enjoy adding nuts for a crunchy bite or extra chocolate for a sweeter finish.
Ingredient Substitutions
If you need substitutions, here are some ideas:
– Use natural peanut butter for a healthier option.
– Swap honey for maple syrup for a vegan choice.
– Try crispy rice cereal for a fun texture change.
These substitutions allow you to adapt the recipe to your diet or pantry. Feel free to experiment while keeping the core flavors intact.
Step-by-Step Instructions
Preparation of Baking Dish
Start by greasing an 8×8 inch baking dish. Use non-stick spray or line it with parchment paper. This makes it easy to take out the treats later. Make sure to cover the sides well. A good base helps the treats hold their shape when cut.
Melting Peanut Butter and Sweetener
In a large saucepan, mix 1 cup of creamy peanut butter and ½ cup of honey or maple syrup. Add a pinch of salt for flavor. Heat this mixture over medium heat. Stir it constantly for about 2-3 minutes. You want it smooth and bubbly. When it bubbles slightly, take it off the heat. Then, stir in 1 teaspoon of vanilla extract. This adds a nice touch to the taste.
Combining Cereal and Chocolate
Now, pour 3 cups of Rice Krispies into the pan with the melted mix. Use a spatula to gently fold the cereal in. Make sure every piece is coated with the peanut butter mixture. While the mix is warm, add in 1 cup of chocolate chips. Fold them in until they melt slightly and mix well. This gives your treats a rich, chocolatey taste. Once everything is combined, transfer the mix into your prepared baking dish. Press it down firmly using the spatula to make it even. If you like, sprinkle another ½ cup of chocolate chips on top and press them in. Let it cool for about 15-20 minutes at room temperature. Then, refrigerate for at least 30 minutes to set.
Tips & Tricks
Perfecting the Texture and Flavor
To get the best texture, use creamy peanut butter. The smoothness helps bind the treats well. A pinch of salt can enhance the flavor. The right balance of sweet and salty makes a big difference. For a deeper flavor, try using dark chocolate chips. They add richness that pairs well with peanut butter.
Common Mistakes to Avoid
One common mistake is overcooking the peanut butter mixture. If you cook it too long, it can become too thick. This will make it hard to mix with the Rice Krispies. Another mistake is not pressing the mixture firmly into the pan. If you don’t press it down well, the treats may crumble when you cut them. Lastly, avoid skipping the cooling step. Letting them cool helps them set properly.
Recommended Tools and Equipment
You will need a large saucepan for melting the mixture. A spatula helps to fold the ingredients together. Use an 8×8 inch baking dish for the best shape. Lining the dish with parchment paper makes for easy removal. A sharp knife is great for cutting the treats into squares. Keep these tools handy to make your cooking experience smooth and fun!
Pro Tips
- Use Natural Sweeteners: If you prefer a healthier option, substitute honey with maple syrup or agave nectar for a different flavor profile.
- Experiment with Nut Butters: Try using almond butter or cashew butter instead of peanut butter for a unique twist on the classic recipe.
- Storage Tips: Keep your Rice Krispie treats in an airtight container at room temperature for up to a week, or refrigerate for longer freshness.
- Customize Your Toppings: Feel free to add chopped nuts, sprinkles, or dried fruit on top for extra texture and flavor!
Variations
Adding Nuts or Dried Fruits
You can easily add nuts or dried fruits for extra flavor and texture. Chopped nuts like almonds or walnuts give a nice crunch. Dried fruits like cranberries or raisins add sweetness. Mix in about half a cup of your choice. Just fold them in with the Rice Krispies. This will enhance the taste and make your treats even more fun.
Different Types of Chocolate
You can switch up the chocolate for different flavors. Try using milk chocolate for a sweeter treat. Dark chocolate offers a richer taste. If you love white chocolate, that works too! Use the same amount of chocolate chips, about one cup. Melt it with the peanut butter for a new twist each time.
Vegan and Gluten-Free Modifications
To make these treats vegan, just use maple syrup instead of honey. For a gluten-free version, ensure your Rice Krispies are certified gluten-free. You can also use a plant-based chocolate. These small changes keep the treats tasty while meeting different dietary needs. Enjoy making your own versions!
Storage Info
Proper Storage Techniques
To keep your Peanut Butter Chocolate Rice Krispie Treats fresh, store them in an airtight container. Choose a container that fits the size of your treats. If you stack them, place parchment paper between layers to prevent sticking. Store them at room temperature for best results.
Shelf Life of Peanut Butter Chocolate Rice Krispie Treats
When stored properly, these treats last about a week. You may notice they become softer over time, but they still taste great. If you want to keep them longer, consider freezing.
Freezing for Later Use
To freeze your treats, first cut them into squares. Wrap each square in plastic wrap, then place them in a freezer-safe bag. Remove as much air as you can to prevent freezer burn. They can stay frozen for up to three months. When you want to enjoy them, just thaw them at room temperature for about 30 minutes.
FAQs
Can I use natural peanut butter instead of creamy?
Yes, you can use natural peanut butter. It has a different texture and taste. Natural peanut butter may be less sweet and can be a bit oily. This may change how the treats hold together. Just stir it well before use to mix in the oil.
How can I make these treats less sweet?
To reduce the sweetness, cut back on honey or maple syrup. You can use only 1/4 cup instead of 1/2 cup. You can also use dark chocolate chips, as they have less sugar. Adding a pinch more salt may help balance the flavors too.
What can I use instead of Rice Krispies?
You can use other cereals if you like. Try cornflakes, puffed rice, or even granola. Each option will give a different taste and crunch. Just ensure they are crispy to hold the treat together well.
You now know how to make Peanut Butter Chocolate Rice Krispie Treats. We covered essential and optional ingredients, plus smart substitutions. I shared step-by-step instructions for easy prep. You learned tips to perfect texture and avoid common mistakes.
Try out different variations and store your treats the right way. Enjoy the fun of customizing your treats. Your kitchen adventures will become even more tast
.png)


